Toasted Breadcrumbs: How to Make Them from Any Bread
This post may contain affiliate links. Please read my disclosure policy.

Homemade toasted breadcrumbs are one of those things professional cooks reach for constantly — and home cooks almost never think to make. A handful scattered over pasta, salad, or roasted vegetables does more for a dish than almost any other finishing step.

The method here works with whatever bread you have on hand: A fresh loaf, a stale end, or slices you’ve already toasted. Crusty sourdough, ciabatta, or country bread all produce coarse, crunchy crumbs with far better flavor and texture than anything from a canister, and they keep well in a sealed container for up to two weeks at room temperature.
Best bread for making breadcrumbs
The bread you start with determines the flavor and texture of the finished crumbs, so it’s worth it to be picky. Crusty, open-crumbed breads — sourdough, ciabatta, country-style artisan loaves — produce coarse, crunchy crumbs. A loaf from a local bakery will give you better results than supermarket bread.
Avoid dense white sandwich bread. It has a tight, fine crumb that turns gummy when processed, and the flavor is flat. The crumbs will clump rather than crisp.
Homemade breadcrumbs vs. panko
Panko is a Japanese-style breadcrumb made from crustless white bread, processed to produce especially light, airy flakes. It’s the right choice when you need a fine, even coating for frying or breading — like these crispy breaded chicken cutlets. Homemade crumbs are coarser and more rustic, which I love as a finishing texture on top of pasta, gratins, and salads. They’re also made from real bread, so the flavor is richer and more complex than commercial panko or canned Italian-style breadcrumbs.
How to make homemade breadcrumbs

1. Slice the bread into ½-inch thick slices and leave the crust on — it adds crunch and color to the finished crumbs. Brush both sides with olive oil. 
2. Toast at 400°F for 5 minutes per side, until the slices are deeply golden. The more color here, the more flavor in the finished crumbs.

3. Let the slices cool until comfortable to handle, then cut into rough ½-inch cubes. They don’t need to be uniform. 4. Spread the cubes on a baking sheet and bake at 300°F for 10–12 minutes, stirring once halfway through. The low heat removes the remaining moisture — it’s what makes the crumbs crisp rather than chewy. They should feel completely dry and hard before you process them.


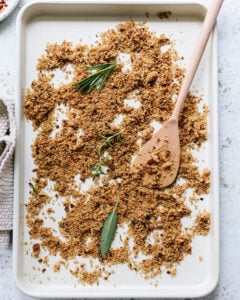
5. Transfer to a food processor with herbs if using. Pulse in short bursts — don’t run the machine continuously or you’ll get dust. 6. Don’t worry about making your breadcrumbs too fine or uniform — different crumb sizes make toasted breadcrumbs pleasingly textural.


How to make seasoned breadcrumbs
Fresh herbs added before processing give these crumbs a light, aromatic flavor — rosemary, thyme, sage, and oregano all work well, used alone or in combination.
For Italian-style seasoned breadcrumbs, add 1 teaspoon dried oregano, ½ teaspoon garlic powder, and a pinch of red pepper flakes to the food processor along with the bread. The result is close to what’s sold as “Italian breadcrumbs” in stores — but coarser in texture and with noticeably better flavor (and no preservatives).
How to use breadcrumbs in recipes
- Pasta: Toasted breadcrumbs are a classic Italian move for finishing pasta, especially with olive oil-based sauces where you want texture without adding cheese. Try them on spaghetti aglio e olio, cacio e pepe, or any pasta with braised greens.
- Mac and cheese: Scatter herbed crumbs over baked mac and cheese before it goes in the oven. They form a crisp, golden crust that contrasts the creamy sauce in a way a plain breadcrumb topping doesn’t.
- Salads: Use coarse crumbs in place of croutons on this Caesar salad or any salad for extra crunch. They distribute more evenly than cubed croutons, and soak up dressing without going soggy as quickly.
- Stuffed vegetables: Mix breadcrumbs with grated cheese, herbs, and olive oil to fill or top my cheesy stuffed portobello mushrooms, zucchini, or bell peppers. The crumbs absorb the vegetable juices as they roast and hold the filling together.
- Soups: A spoonful of crispy crumbs on top of a bowl of soup adds texture where there otherwise isn’t any. In this roasted fresh tomato soup, they also do the work of a thickener — a classic Italian technique.
Toasted Breadcrumbs: How to Make Them from Any Bread
Ingredients
- 4 ½-inch (200 g) slices fresh sourdough (7-8 ounces total), or other type of crusty bread
- 2 tablespoons (30 ml) extra virgin olive oil
- 2 tablespoons chopped fresh herbs, such as rosemary, thyme, oregano or 1 teaspoon dried herbs
Instructions
Yield: About 1 cup
- Preheat the oven to 400 (200C) degrees
- Brush the bread slices on both sides with the olive oil. Arrange them on a baking sheet.
- Put the baking sheet in the oven to toast the bread for 5 minutes. Flip the slices over and toast 5 more minutes.
- Remove the bread to a cutting board and let them cool a few minutes. When they feel cool enough to touch, cut into approximately ½-inch cubes. Spread the bread cubes in one layer on the baking sheet. Lower the oven temperature to 300 degrees.
- Put the baking sheet back in the oven 10-12 minutes, stirring them around halfway through, until are golden brown and feel dry. Cool 10 minutes.
- Transfer the bread cubes to a food processor. If you like, add the herbs to make seasoned breadcrumbs. Pulse to form crumbs about the size of small pebbles — it's okay if some of the crumbs are larger than others (they're rustic!). Try not to pulverize the crumbs to a powdery dust.
- Transfer the breadcrumbs to a sealed container. They'll keep 1-2 weeks at room temperature, 1 month refrigerated and 3 months in the freezer.
Karen’s Notes and Tips
- Use a larger baking sheet or multiple ones to double or triple the recipe. Process the crumbs in batches, depending on the size of your food processor.
- Make breadcrumbs without a food processor: Put the dry, toasted bread cubes in a heavy-duty plastic zipper bag (or double them up). Bash the cubes using a potato masher until the bread is broken into crumbs.
- These crumbs are too coarse for breading or deep-frying — they won’t adhere the way manufactured breadcrumbs do. Use them as a finishing topping instead.
Nutrition per serving
Nutrition facts are calculated by third-party software. If you have specific dietary needs, please refer to your favorite calculator.

Hey, I’m Karen
Creator of Familystyle Food
Professionally trained cook, cookbook author, and the person behind every recipe here. I cook the way I was trained: Start with good ingredients, understand why they work, and don’t apologize for the salt. These are the recipes I actually make, for the people I love. Read more about me here.