Peanut Butter Cream Pie (Dairy-Free)
This post may contain affiliate links. Please read my disclosure policy.

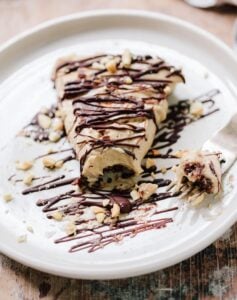
My version of a creamy, dreamy frozen chocolate peanut butter pie. This no-bake recipe is made with a base of cashews instead of cream.

I was scrolling through my Instagram recently and found myself drooling over a slice of peanut butter cream pie, posted by someone eating at a restaurant in Australia, of all places.
Aside from the mouthwatering pic, I was intrigued by the idea that peanut butter cream pie, which I’ve always thought of as a distinctly American dessert, has traveled to the ends of the earth to delight hungry people Down Under.
But — back to this particular pie. You know what it’s like to be struck by a craving. My instant attraction to the lofty, chocolate-lashed pie I saw on social media meant peanut butter cream pie needed to happen, pronto.

I wanted to make a pie in the classic tradition of a good, old-fashioned peanut butter cream pie — a confection with a rich, cloud-like texture and that intense peanut-butter-cup flavor, with less of the dairy and sugar that makes it feel overwhelmong
The crust layer is a simple blend of ingredients, including walnuts, cocoa and maple syrup.

The secret to the rich filling is based on unroasted cashews — they make a delicious, neutral-tasting cream when soaked and blended.
This is a very easy recipe, but you will need to get your hands on a high-speed blender (preferably) to make a super-smooth, rich cream.
Peanut Butter Cream Pie (Dairy-Free)
Equipment
Ingredients
Yield: One 9-inch pie
Filling:
- 2 cups (g) raw cashews
- ¾ cup unsweetened creamy peanut butter
- ½ cup (118 ml) maple syrup
- 1 teaspoon fine sea salt
- 1 whole vanilla bean
- 2 ounces (55 g) semisweet or bittersweet chocolate(choose vegan chocolate if you prefer), chopped
- ⅓ cup (50 g) chopped unsalted peanuts
Crust:
- 2 cups raw walnuts or almonds
- ¼ cup cocoa powder
- 3 tablespoons (45 ml) maple syrup
- 1 tablespoon (15 ml) melted coconut oil or vegetable oil
- 1 teaspoon vanilla extract
- ¼ teaspoon sea salt
Instructions
Make the filling:
- Cover 2 cups raw cashews with water and soak for 15-30 minutes.
- Drain the cashews and put into a powerful blender or a food processor. Add 1 ½ cups cold water, ¾ cup unsweetened creamy peanut butter ½ cup maple syrup and 1 teaspoon fine sea salt. Split the vanilla bean and scrape the seeds into the mixture. Puree until very smooth, thick and creamy (if the mixture becomes too thick to blend, add more water one tablespoon at a time until it's the right consistency).
Make the crust:
- Process 2 cups raw walnuts or almonds in a food processor until they look like coarse flour. Add ¼ cup cocoa powder, 3 tablespoons maple syrup, 1 tablespoon melted coconut oil or vegetable oil, 1 teaspoon vanilla extract, and ¼ teaspoon sea salt and pulse until mixed. Press the crumbs into the bottom of a 9-inch deep pie dish or tart pan with 2-inch sides.
- Pour the filling into the crust and place in the freezer for 10 minutes.
- Put the chocolate in microwaveable dish and heat on high in 30 second increments, stirring each time, until it’s melted. Spoon some of the chocolate in random blobs over the top of the filling (save the rest for serving). Use a skewer or thin knife and swirl the chocolate into spirals (be sure not to touch the crust layer).
- Cover the pie and freeze until firm, about 2 hours, then transfer to the refrigerator. Serve drizzled with more melted chocolate and sprinkled with peanuts.
Karen’s Notes and Tips
- You need a 9-inch deep-dish pie plate, or a 9-inch tart pan with 2″ inch sides (also known as a quiche pan).
- Store the pie refrigerated 2-3 days.
Nutrition per serving
Nutrition facts are calculated by third-party software. If you have specific dietary needs, please refer to your favorite calculator.

Hey, I’m Karen
Creator of Familystyle Food
Professionally trained cook, cookbook author, and the person behind every recipe here. I cook the way I was trained: Start with good ingredients, understand why they work, and don’t apologize for the salt. These are the recipes I actually make, for the people I love. Read more about me here.
YUM! Looks so delicious and perfect as a summer dessert!
Thanks Natalie! It’s hard to pass on this one 🙂
oh, you are making me so hungry! this looks just wonderful. XO